Advanced Minesweeper strategy: how to solve hardest Minesweeper boards

Adam has a PhD in Economics, is responsible for writing technical articles and oversees development of online applications. You can find him at:
https://narkiewicz.info/
https://www.linkedin.com/
Synopsis
This article presents an ultimate method of solving complex Minesweeper boards. This method relies on finding combinations of mines allowed by the numbers available on the board. Two combination rules are provided. The first rule allows us to find out the best move if the board can be solved without guessing. The second rule allows us to determine whether guessing is necessary. Moreover, analyzing combinations can be used to find out what the best guess is, in case a guess is necessary. The article shows how to do it using an example and describes why it works.
There are many types of Minesweeper players. Some of them just play casually: start with the easiest difficulty level, click here and there, lose some games, win some games, and move on. Other players are more ambitious and try to perfect their skills by playing as quickly as possible. What they want the most is to improve their best times. They often abandon games that initially seem hard, fearing that they won’t be able to get a good time. They continue playing only when the mine layout is favorable. This is in contrast to yet another category of players, who want to solve any game, no matter how hard. For them, the achievement is a high win ratio, while their best and average times are less important.
This article is dedicated to the players in the last category: those for whom speed is less important than winning every time. Moreover, it is aimed at advanced players who know basic Minesweeper tactics and already have a lot of experience: there are many introductory topics which will not be discussed here, such as patterns or advanced logic. Many great articles on such introductory topics are available on the Internet. If you don’t have much experience under your belt, you should start your reading there and only then come back here. Two of such articles are listed below:
The basics
Consider the following scenario: you are playing on the Expert difficulty and towards the end of the game, you have reached a point when you are not sure what to do next. You don’t know any patterns that match the current layout. You try to use logic, but you can’t come up with a solution. It is not obvious that this is a situation in which a solution even exists. Maybe you should guess? And because guessing seems to be the only way, you make a guess… and you lose. Oh no! And then you wonder: was it a mistake, or was the board really unsolvable and the guessing was necessary?
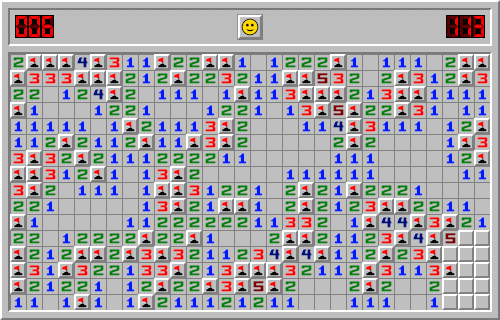
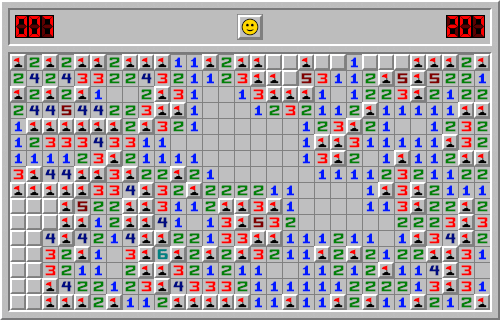
Look at the two examples shown in Figure 1 and Figure 2. Are you able to decide whether a guess is necessary in these situations? As an experienced player, you know that you cannot fully trust your skills: if you too quickly reject game boards you cannot solve as unsolvable, you would never be able to improve. On the other hand, you may spend a lot of time trying to solve a game board without success and still be unsure if it was truly unsolvable or if you just lacked the necessary skills. “To guess or not to guess, that is the question,” as one famous Minesweeper player once quipped. In other words, the question is: is there a way to reliably determine if any particular board is solvable or not? And the answer is yes, there is.
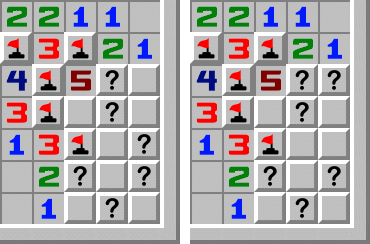
Let’s start with the basics. You have a board with some still covered squares and with a few mines remaining to be found. There are many ways you can assign these mines to the covered squares. Let us call a way we assign mines to squares a combination. So combinations differ in how they assign mines to the yet-uncovered fields. But not all combinations are interesting to us. If there is a “2” uncovered somewhere on the board, you can rule out all the combinations that have an inappropriate number of mines around this “2.” Let’s call appropriate combinations those combinations that are in agreement with the digits visible on the board (see Figure 3, left). In contrast, let us call inappropriate combinations all those combinations in which some digits have an inappropriate number of mines around them (see Figure 3, right).
Combination rules
Here are the rules governing mine combinations:
- If you can prove that all appropriate combinations have a mine in a certain spot or that all of them do not have a mine in a certain spot, then there is no need to guess: you just found your next move. Place a flag where they all have a mine or open the square if it never hides a mine.
- If you can find two or more appropriate combinations such that for every field at least one combination has a mine in this field and at least one combination does not have a mine in that field, then the solution does not exist and you have to guess.
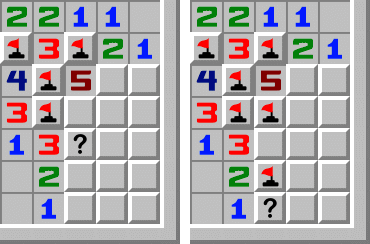
Let’s see how it works in practice. In Figure 4, on the left, we see a simple situation. We can easily prove that a mine has to be hidden under the question mark in all appropriate combinations. Why? Because if it isn’t there, we have to flag the remaining two fields around the “3,” as shown in Figure 4, on the right. Then we immediately end up with an inappropriate combination because of the field with a question mark: if it has a mine in it, the “1” is violated, if it doesn’t, the “2” is violated. This reasoning is quite mundane, as the rule number 1 in this case just tells us what we already know about solving Minesweeper.
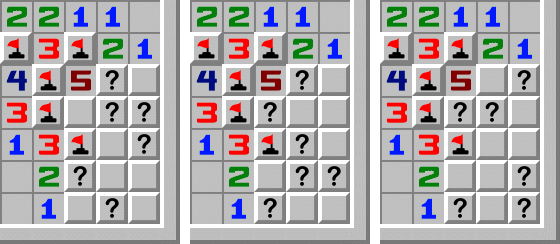
We can now go back to the example from Figure 1. After many failed attempts at solving the game in a traditional way, we start to suspect that guessing will be necessary. Let’s try to build a few combinations to prove that. We want to come up with a few combinations that are as different to each other as possible. The results can be seen in Figure 5: we found 3 combinations that allow us to apply the rule number 2. To see why, pick any covered field: you can easily see that there is a combination that has a question mark in that field and there is another combination that does not have a question mark in that field. This is a situation described by rule number 2. Therefore, it is clear: we have to make a guess.
Solution example
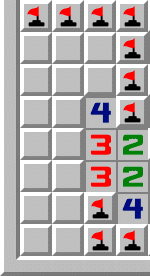
Do we have to guess in the example from Figure 2? This board has two unsolved areas: one at the top and the other in the bottom-left corner. It is easy to see that any appropriate combination requires at least 4 mines to be placed within the area at the top: two mines have to be placed next to the “5” on the left, there must be a mine next to the “1” in the topmost row and one more mine must be somewhere close to the “5” on the right (see Figure 6). And because the total number of remaining mines is 7 and at least 4 must go to the first area, there can be at most 3 mines in the second area. But a quick check shows that 2 mines are not enough and at least 3 are required there (see Figure 7). Hence, exactly 3 mines are in the bottom-left corner and exactly 4 are in the area at the top.
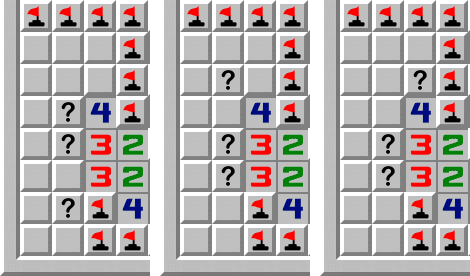
The fact that exactly 3 mines are in the bottom-left area is very useful as it allows us to apply rule number 1. We can utilize this rule in two ways. First, it is easy to see that all 3 mines must be adjacent to the digits “4,” “3,” and “3” in the third column, i.e. the mines must be in the second or third column of the game board. Therefore, the entire first column is mine-free and can be uncovered. Secondly, we can come up with all appropriate combinations of mines in this area, which are shown in Figure 8. It is easy to see that in all combinations there is a mine to the left of the upper “3.” Since all appropriate combinations have a mine there, the mine must be there and we can mark this tile with a flag. This game can be solved without guessing.
The rules about the combinations can require a lot of work and be cumbersome, but if done properly they will eventually help you figure out even the hardest problems. Like a tank squashing anti-personnel landmines underneath its tracks, working out the combinations slowly squashes all the problems standing in your way. Firstly, it tells you whether you have to guess or not. Secondly, if no guessing is necessary, it tells you what your move should be. Thirdly, if guessing is necessary, it tells you what is the best guess.
The best guess
Let’s go back to the board in Figure 1. We already know that it cannot be solved by logic alone and the player has to guess. As it turns out, we can also use appropriate combinations to figure out what the best guess is. Unfortunately, this requires us to find all appropriate combinations, whose numbers may sometimes be in thousands or even in millions (to put things into perspective, there are possible 1878392407320 combinations in the fully-covered Beginner board). But once we know all combinations, we can look for fields that hide mines in most combinations – these are our candidates for a flag – and fields that have mines in very few combinations – these are our candidates for a left-click.
Although it may initially sound a bit daunting, finding all appropriate combinations does not have to be very difficult. For example, for the board in Figure 1, we see that there are 13 covered fields in the unsolved area. Six of them are next to numbers and seven of them are not (see Figure 9, on the left). Moreover, it is easy to see that there are only three appropriate combinations when we consider only the fields that are next to the numbers. You can see all three in Figure 9.
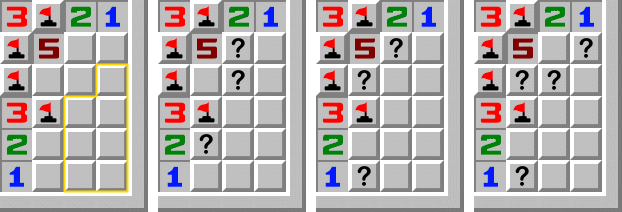
Now we can easily count all appropriate combinations for this board, including both the fields that are adjacent to the numbers and those that are not. First, let’s consider the first combination in Figure 9. It only has three mines, and since there are six mines in total yet to be placed on the board, three mines remain to be placed within the seven fields marked with the golden contour. In how many ways can we arrange three mines in these seven fields? There is a formula for the number of combinations which is

and which in our situation yields C(7,3) = 35. This means that there are 35 appropriate combinations that correspond to the first combination in Figure 9. Similarly, the second combination in Figure 9 also uses only three mines out of six and so there are three mines left for the fields marked with gold. Hence, we can use the same formula to find another 35 combinations. In total, we have found 70 combinations so far.
The third combination in Figure 9 differs from the previous two because it has four mines in the fields adjacent to mines. This means that there are only two mines left to be placed in the seven fields marked with gold. We can arrange two mines in seven fields in C(7,2) = 21 ways. This brings up the total number of appropriate combinations to 91. And that’s the final number: we found them all.
Now we can start calculating the probability of hiding a mine for every field. Let’s start with the field in the bottom-left, next to the “1.” This field does not have a mine in the first combination in Figure 9 but has a mine in the second and in the third combination. The probability that it hides a mine is equal to the number of combinations that have a mine in this field, divided by the total number of combinations. This calculation yields (0 + 35 + 21)/91 ≈ 0.615. That is, if we open this field, there is around a 61.5% chance that we will discover a mine. This suggests that if we have to guess, we should place a flag in this field. However, 61.5% is still quite close to fifty-fifty, so maybe if we keep calculating we can do better.
The field immediately above the one we just considered, next to the “2,” has a mine only in the first combination in Figure 9. So, the chance that a mine is there is (35 + 0 + 0)/91 ≈ 0.385. Once we know that, we jump over the flag and the next field above, the one below the “5” prompts exactly the same calculation as the first field we considered, hence its likelihood of hiding a mine is around 0.615. Similarly, the field on the right, the one in the bottom-right corner of the “5” is in the first and the third combination, but not the second, so its probability of a mine hiding there is (35 + 0 + 21)/91 ≈ 0.615. How about the field to the right of “5?” This one is in the first two combinations but not in the third, so the calculation for this field yields (35 + 35 + 0)/91 ≈ 0.769. And for the field in the top-right corner, the calculation is (0 + 0 + 21)/91 ≈ 0.231.
What remains to complete our calculations are the squares surrounded by the golden contour in Figure 9, the ones that are not adjacent to any numbers. These fields are similar to each other in a sense that there is nothing that would differentiate them in terms of the probability of holding a mine. Therefore, for all of them, the probability of holding a mine is the same. And what is it? If we are in the first combination in Figure 9, which happens with a probability of 35/91, we have three mines to be distributed over seven fields, so the probability for any given field to hold a mine is 3/7. The situation is exactly the same for the second combination. However, for the third combination, which can happen with a probability of 21/91, there are only two mines left for the seven inner fields, so the likelihood that any given field hides a mine is 2/7. Now we can combine all these conditional probabilities to calculate the overall probability of holding a mine for each of the seven squares:

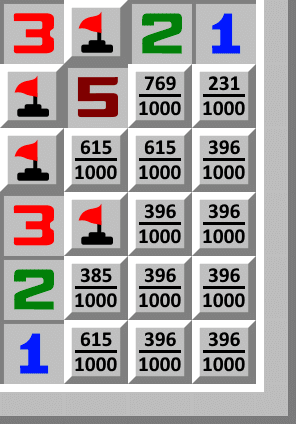
This completes our calculations which can be seen in Figure 10. Once we now the probabilities of holding a mine for each of the covered fields, we should select the field for which the certainty is the greatest, that is the field for which the probability is as close to 1 or as close to 0 as possible. The two fields with the greatest certainty are the fields in the top row, on the right side of the “5.” The one on the left (closer to “5”) has a probability of 0.769 which is as close to 1 as 0.231 is to 0. (Obviously, because 1 - 0.769 = 0.231.) This suggests that the best guess in this particular game is to place a flag on the field with 769/1000 or open the field with 231/1000.
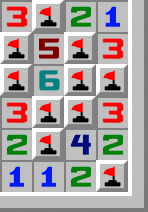
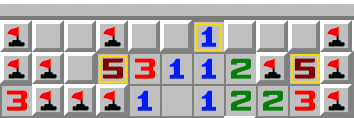
Does it help us in any way? Yes, because as it turns out in this particular example the best guess was correct. There is a “3” below the “1” in the top right corner of Figure 10 and once we know that, we can proceed to solve the game in the traditional way using logic and without any more guessing. The relevant fragment of the solved board can be seen in Figure 11.
Why does it work?
This procedure is well grounded in probability theory (which is why it is so math-heavy and which is why you may have trouble following it if you are not well-versed in this branch of math) and is based on the assumption that each combination of mines is equally likely. So, if there are 91 possible combinations, as in the example above, then if we encounter the same situation many, many times, then we get each combination on average once every 91 trials. To put it differently: let’s say that we have to solve thousands of boards that look like the board in Figure 1 but every time the locations of mines underneath the covered fields may be different. Then, our calculations are valid as long as each of the 91 appropriate combinations appears equally often. We will of course make mistakes, because probability theory by its nature does not give certain answers, but if we stick to the best guess every time, we will be right in around 77% of the cases and wrong in the remaining 23%.
But is it really true that every combination of mines is equally likely? It depends on the implementation of the particular Minesweeper clone you are using. Some of them may use weird mechanisms for mine placement for which this assumption will not be true. In our game every combination is equally likely if the player uses the “Fully Random” board generation mode. This is because of the way the game board is created: the mines are placed by the Fisher-Yates shuffling algorithm, which is guaranteed to generate combinations that are equally likely.
For “First Try Safe” and “Pure Intellect” the story is a bit different, because after using the Fisher-Yates algorithm, the mines are relocated based on the player’s first click. As a result, the combinations are no longer equally likely. The “Pure Intellect” mode is not interesting to us here, because guessing is never needed when it is used which renders the above calculations unnecessary. In the “First Try Safe” mode only a few mines get relocated (if any) which should have little effect on the probabilities of various combinations, especially for larger boards. Therefore, even for the “First Try Safe” mode this method should work well.